I come from a long line of sign writers and am happiest with a brush and some paint! Add
paint to fabric and I get really excited!!

Thursday, July 31, 2014

Kaffe Fassett, We Meet Again!

In 1975 my sister Joanne, of Madaboutcolour fame and I boarded a plane with backpacks and dreams and found ourselves in England. Being maybe a little bit hippie and a lot dedicated to handcrafts, we focused our adventure on design, museums, live theatre, buying up wonderful items like Birkenstocks for 25.00!!(me) and corduroy jumpers and skirts at Selfridges (Jo). We spent a full week going to the Victoria and Albert Museum where time stood still for us to sketch (Jo), wander and soak it all in (me). We stayed in hostels, cheap rooming houses, B&B’s, and gathered stories as we experienced life on the road. We saw sooo many theatrical performances! Chorus Line, Agatha Christie’s The Mouse Trap, Swan Lake (for perhaps the 10th time....growing up on PEI with the Confederation Centre and its focus on live entertainment meant we had the opportunity to see lots of ballets), and Jesus Christ Superstar to name the most memorable.

We also visited a small shop in downtown London to see an interesting display of knitted items. I remember there weren’t an overwhelming number of pieces, but each piece there demanded your attention. Machine knitting was something I was just vaguely aware of and fashion design in these days before the immediacy of the internet, was something you saw in magazines. Joanne, being very smitten with the work we saw, bought a beautiful hand knit vest, it being the one article she convinced herself she could afford. We chatted with the proprietors/artists, no doubt gushing over the amazing designs..

I am not really sure when the pieces all began to fall into place, but on July 18th, in a little church in Amherst, Nova Scotia, Joanne stood up and showed Kaffe Fassett one of his earliest knitted vests, designed by his then partner, Bill Gibb. And the circle grew even tighter; she also presented Kaffe with a photocopy of her Scottish born husband and Bill Gibb in a class photo taken when they were both youngsters, attending the same school, sharing a desk. Kaffe very graciously accepted the photo and seemed pleased and intrigued to see a piece of his early work. He listened as Joanne explained that Bill and her husband had been close school friends and had spent hours preforming plays Bill made costumes for.

After Kaffe’s talk, he patiently chatted and signed books for attendees. He signed several books of Jo’s extensive collection of Kaffe books and again thanked her so kindly for her thoughtful gift. I remarked that he didn’t look a day older than the first time we spoke, way back in 1975 in that little showroom  on Bond Street..

Wednesday, July 30, 2014

Butterlies on the Yellow Brick Road

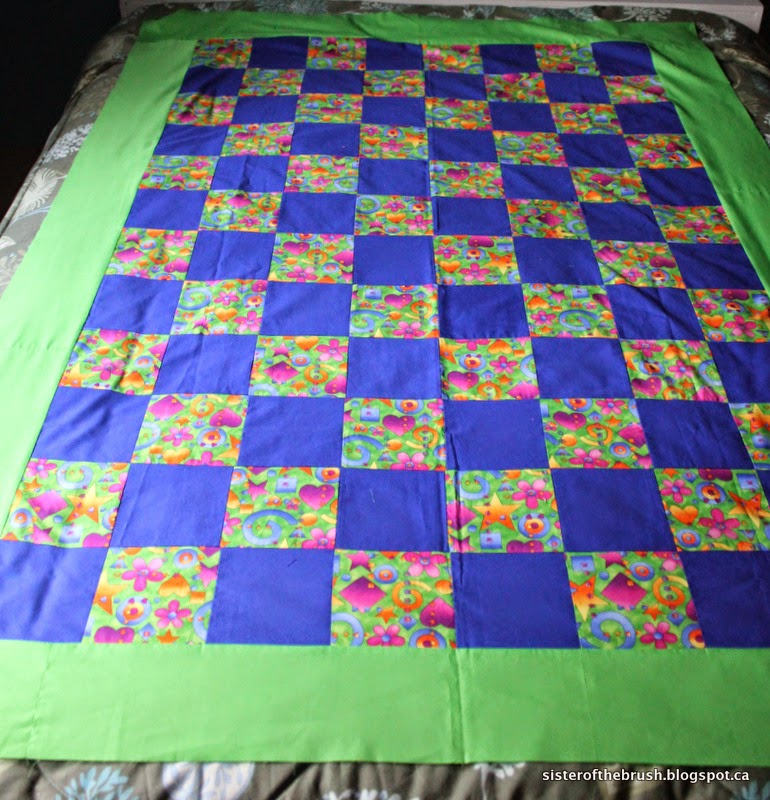
This is a client’s Yellow Brick Road quilt she pieced for her granddaughter.
Before quilting photo
She provided me with a cotton batting, pale yellow fireside for the back and requested a butterflies for the quilting pattern. I used a soft yellow toned neutral thread for top and bobbin.

My sister is a sewer, but essentially a non-quilter. At her request, I try to remember to include the before photo of a project in my posts, because as she says, she and many others cannot envision how stitching will alter the look of a pieced top as it transitions to a finished quilt. I like that even simple designs can accomplish this transition. So many times I think how great it would be to cover that top with intricate stitching designs, but the reality is, not every quilt needs this, nor does it contribute to the purpose of the quilt, and as well, not everyone wants to spend the extra money it would cost to pay for the additional time it would take.
After quilting photo


In this case a pantograph design worked really well for the purpose this quilt was meant and it is very pretty with its airy butterflies on the summery, fresh fabrics. It is currently being well used and loved by Sharon’s granddaughter.


I am linking with Monika and other Canadian stitchers at The Needle and Thread Network.

Wednesday, July 23, 2014

Even More Sun Printing!


I can’t seem to get enough of making sun prints! A little walk along my favorite beach yielded a nice size bag of gull feathers to use in creating more fabric this way.
In order to make the feathers lie flat on the fabric, I had to snap the quill, or shaft, in two or three places along the length. Even so, they balanced precariously in some spots.
I know if I add paint to the fabric, brushing over the feathers, they will stay in place a bit better. But, once I have painted my fabric, I hate to muck up my design and coloring, so I hesitate to do that. So, I snapped and pressed and tried to will the wind away. The feathers stayed down quite well on my first pieces, and I wandered off to do other things.
While I disappeared, a breeze started blowing and jostled some of the placements on the second batch. Once the fabric is dry, the opportunity for printing is lost, so they didn’t turn out quite as I had planned.

But, I liked the subtlety of the design and since these are only the first layer of many in my quest for complex cloth, I know I can work with the results. 


Today I am linking up to The Needle and Thread Network. 


Tuesday, July 22, 2014

Flowers and Hearts Church Fund Raiser Quilt

This is a lap quilt a local church group pieced for a fundraiser this fall. They were going to tie it, but when I heard about their project, I offered to quilt it because I thought they might be able to raise more if it was quilted.
The before photo


They allowed me to quilt as I chose, so I picked a couple of design elements from the fabric and used those to quilt in my free styling, makes me happy way.
I assumed some lucky little girl would end up with this cute little quilt, so I quilted flowers and hearts in an all over pattern. I used my favorite Glide thread top and bobbin and used a wonderful shade of green called “Turf".
I received a lovely thank you card from the St. John’s U.C.W., so I think it met with their approval.
The finished quilt before binding.

I hope they are able to generate a nice tidy sum in their fund raising efforts.

Saturday, July 19, 2014

More Sun Prints

After a string of wet, rainy days, the sun popped out and I hurried to make the most of it. There was a wash on the line, some biscuits baked in my outdoor oven and a few more sun prints completed. 
 Creating these fabrics is addictive. 

Close up

Close up                                                                        

Friday, July 18, 2014

Summer Flowers

A few rainy day flower photos with a sunny Asiatic Lily tossed into the mix....


Tuesday, July 15, 2014

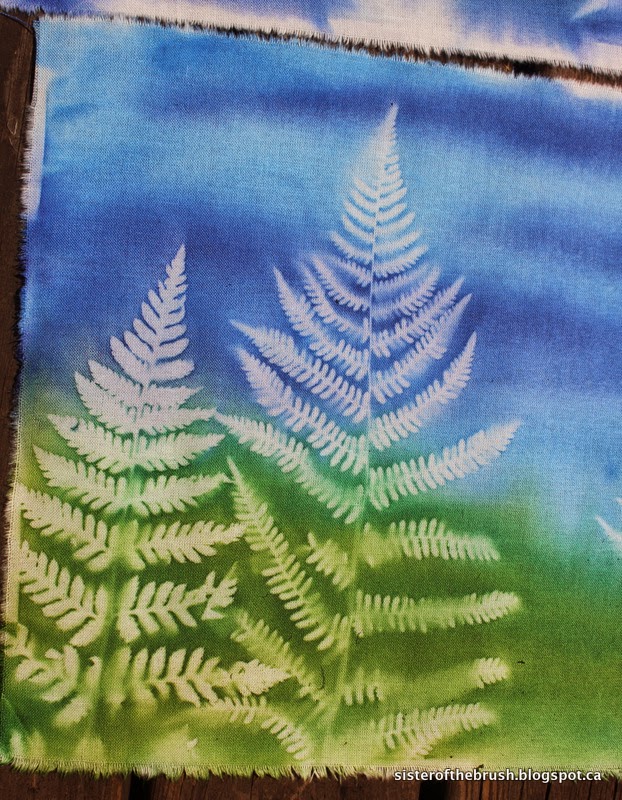
Sun Printing Fabrics

That little side trip to Vermont whetted my appetite for fabric painting, so I squeezed a day of play into my busy retirement schedule. As is my habit, I gathered my supplies and tools needed to work on some prototypes for a larger piece I have in progress. And then I proceeded to set up for sun printing. I do that all the time..decide I am working in one technique and then change midstream and start another. This probably drives others (read: husband and offspring) a bit crazy, but it seems to work for me. I am running one process through my head, all the while getting another process set up.

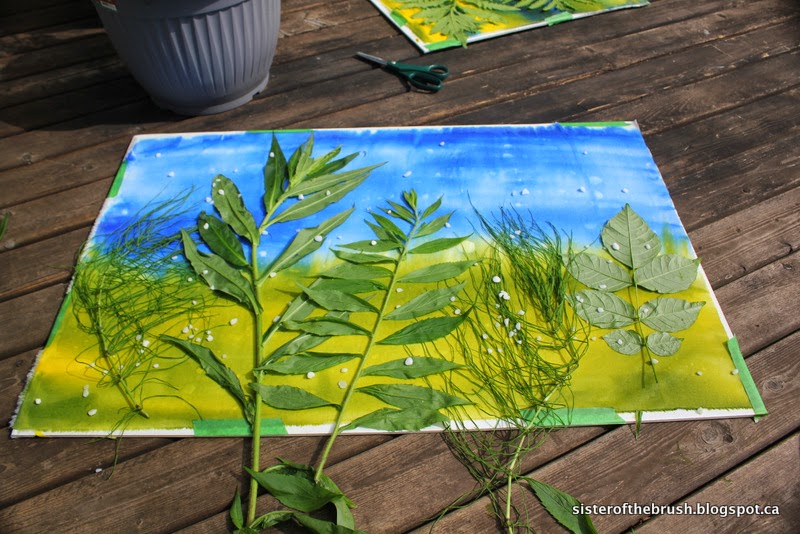
Well, it turns out I picked an A-1 day for sun printing! The tools are basic and the process is easy and fast. I used PFD (prepared for dyeing) fabric, a couple of Setacolor Soleil Paints I had, some wide bristle and sponge brushes, a spray bottle, a piece of foamcore covered and sealed with plastic wrap, some painters tape and a handful of coarse salt.
Then all I needed were objects and materials to print. I collected some leaves, grasses, weeds, some plastic doilies that had been my Grandmother Robertson’s, some buttons, coins and chain.


After cutting my fabric to the size that would fit on the foamcore, I ironed it and taped it in a few strategic spots onto the board so that brushing paint on it  wouldn’t be tedious.


I sprayed my fabric to the extremely technical point of “very wet” and then started brushing paint on. If you don’t have Setacolor Soleil Paints, you can use Setacolor Transparent Paints watered down in a 1:1 ratio. 

If it is really sunny and hot, you need to do these steps fairly fast because your paint will dry quickly. This did happen to me several times and I just gave my fabric a spray of water and I got another effect doing so.


Once you have your paint on, then you pick your items to print, lay them on top of the painted fabric and press them into the fabric. This is also when you can toss the coarse salt over the fabric for added effect.


Then you wait for the paint to dry, which on a beautiful sunny day, doesn’t take any time at all.


Once your painted fabric is dry, remove the objects and materials you used to print, remove the tape and then using a hot dry iron, press your fabric. It’s now heat set, pressed and ready for use! Fun, fun!


Today at Blossom Bake and Create blogger Lynda has a great post with links to even more information about preserving botanicals for use in printing. It is an excellent post and I am anxious more now than ever to get collecting some grasses and leaves to preserve for future surface design sessions.

I am linking to The Needle and Thread Network.