Monday, February 25, 2013

My weekend in photos

I spent this weekend at our quilt guild’s winter retreat. For the first time in three years, there wasn’t a snowstorm on Friday and everyone was able to travel worry free! We hold our retreat in Sussex, a small community about an hours drive from Moncton, so snow can make getting there and back stressful.

After we were set up and working away, I looked around the room and noticed the large number of these beauties being used.....


Singer Featherweights seem to be the retreat sewing machine of choice for quilters; they are easy to transport and are the work horse of the straight stitch. They have also increased in price exponentially as their popularity has risen. 

There were also some of these helping provide atmosphere at our table.....


When my roomie and I realized we had a fridge and a microwave in our room, we made a quick trip to the Superstore to buy some lunches we could heat up. These potted tulips beaconed to Nancy, so they were added to her shopping cart. They were meant to brighten our room, but they ended up staying near our sewing machines. It was a bonus for the group at our table because we all got to enjoy them!

The restaurant attached to the hotel is a 50’s diner and for breakfast you can’t beat their cooked porridge with brown sugar and milk! I am also enamoured with their jukebox that has been modified to play CD’s.....


I could happily own one of these puppies! I would put it right next to my longarm. Santa! Are you listening??

When I got home Sunday, my hubby and I headed out for a trip on the woods on our snowshoes. We explored a bit of trail we hadn’t been on before and ran into a friend and his dog as we headed back up a hill. By then I was fine with stopping for a chat. Quilt retreats involve sitting too much, snacking too much, talking a lot, very late nights and possibly more wine than is required. I welcomed some recovery time on that incline.

We often snowshoe through a nearby maple sugar camp and every winter I take photos of the buildings. I suspect this building may not last many more years......


I hate to see it fall into disrepair, but I have some plans to use this image in some art work very soon. I love the juxtaposition of the lines and the wonkiness it portrays. 

And I love the grain and color of the wood of this weather beaten building....


I enjoy taking detail photos and when I saw these leaves, I had to stop and snap a few.....


I could have spent hours focusing on the frozen drips if I had my “real” camera with me. And on another day, I think I will do just that.


Wednesday, February 20, 2013

Machine Embroidered Fabric

This has been a fairly labour intensive project, but one I wanted to try for ages. I used a selection of those lovely decorative stitches on my Pfaff to create a piece of fabric. This piece is designated for my sister and her beautiful photo prop dresses but now that I have tried it, I will change it up a bit and create another piece to use myself in a small quilted project of my own. It was great practice though kind of boring because you have to pay close attention to what you are doing. That means no straying eyes so no distracting movies on the laptop....darn!


Having our daughter home on Valentine’s Day meant her Dad bought me some beautiful flowers, specifically tulips. They sure brighten up my kitchen, especially when outside there seems to be snow, snow and more snow these days. Anyway, they are too pretty to not share. Enjoy.....


I am hooking up with The Needle and Thread Network. Check it out and see what other needle folk across Canada have been up to!

Shabby chic ala Madaboutcolour

My sister and I have collaborated on some new pieces for her successful line of baby props! I am providing the quilted fabric for the bodices of the dresses and  it is great fun to work on. I have another piece on my longarm for Joanne in a beautiful soft peach that looks just so “shabby chic”! I know it will be so sweet on any little babes that might be lucky enough to wear one of these dresses in a photo shoot!


Joanne’s work can be found at her Madaboutcolour etsy shop.


Monday, February 18, 2013

Color me.....Well, just color me!


With snowstorms and blizzards everywhere and often, I know most of us have seen more than our fair share of snow covered trees and hills of snow this year. I took a bunch of pics with my iPhone when we were out clearing our walkway and driveway (for the third time in 24 hours). Out of them I pulled these and then thinking we could all probably use a bit of color and festivity (well, I know I could), I added some color in a most unnatural manner. I immediately felt better.


Thursday, February 14, 2013

Longarming Logic

Life has been altered in many ways of late and I have found using my longarm machine meditative and therapeutic. My parents were very excited for me when I purchased my Millennium and I had hoped to be able to give them hands on demonstrations eventually. Both Mom and Dad had always been supportive of new technology and equipment that made the job easier, more manageable, was more cutting edge. Dad was one of the first sign shops owners to embrace computer signwriting equipment. We still talk about the business’s first calculator that cost 2500.00 and took years to pay off. He ordered cutting edge engraving equipment, the newest of boom trucks, had a car phone in 1973, and he bought Mom a beautiful top of the line Bernina sewing machine as soon as they became available in Canada. He embraced technology, all with Mom’s blessing and full support. Yet, never has there been a bigger history buff and the car of choice for many years has been a 1963 VW Bug. A study of contrasts? You bet! With a love and appreciation for what came before, Dad loves to envision and work toward what new incorporating tools and technology can accomplish in conjunction with the skills already in place.

So you can bet he is enthusiastic when I show him what I am creating on my longarm!

In our family, we call doing some things as doing them the “George way". That means the instructional booklet that comes with a new piece of equipment is meant to be read as a final resort, if at all. Now, I tend to read those booklets; I actually pour over them, make numerous copies and post them near my work space, write notes in the margins. Yet still, my Dad’s way has taught me to be resourceful, use the booklets as guidelines and figure out ways to make things work for me. As I have been learning to use this wonderful new machine, I have been relying on the “George way” when I need to fine tune something I am working on.

For example, I know I am supposed to have an additional 3 - 4 inches of backing when I load a quilt. Well, several times I have discovered I just don’t have the extra fabric required and I need what I have to work. I found the clamps on the sides were getting in my way, so I decided I needed to elevate the clamps a bit from my work so that they wouldn’t catch on the bed of the machine. A piece of dowel on each side holding the clamps and straps up about 1/2 an inch allows me that little bit of space I need to keep the clamps up and away. This allows me to quilt to the edge of my top even though I may only have an inch or two of backing grace on each side.

Then I decided to try to eliminate the clamps entirely. Using the heavily quilted piece of fabric that was used to test run my machine before I received it, I cut pieces 4 x 5 inches, folded them in half and pinned them to the other end of the straps. Then I flipped the straps over the side rail and pinned them to the backing/batting and top. This is allowing me to quilt the entire piece of fabric I have loaded almost completely edge to edge.


The piece I have on the machine now is for a specific project and is the smallest quilting design I have done to date. It is slow and I discovered sitting while quilting would be a grand idea - much easier on my back. Rather than repeatedly hopping off my chair, but wanting to see how my quilting was on the reverse side, I used my iPhone to reach under and take a photo of just how things were going. You have to tap the reverse photo feature for this.


While working on several pieces, I also noticed I was able to control bounce of the top if I added a bit of weight to my top. I have found a Magic Bag works great for this and it also provides a safe reseting spot for my scissors, which tend to never be where I think I last put them. I am able to manage the bounce and the weight by positioning the bag over the roller bar.


Frustration over my last pantograph and a Type A personality ( it’s an official medical diagnosis....try living with that...) led me to adding a piece of painter’s tape over the laser light. I can’t take credit for this but I thought it was ingenious when I saw it somewhere online. Once you put the tape on, you poke a pin hole in the tape and then you have a very small point of light allowing for more accuracy when following your pantograph pattern. I am sure it isn’t necessary for all patterns, but it was useful on that particularly detailed one I was trying to stitch.


I have to admit, with the exception of my brother, I am probably the slowest in my family at thinking outside the box. As my husband says, I need to think more logically. I miss my Mom’s daily tips on how to solve whatever problem is plaguing me; she could always be counted on to come up with something ingenious to help me out and make life easier. I try to follow Dad’s methods, use my husband’s advice and channel my Mom’s ingenuity every day as I strive towards becoming a prolific longarmer. 

Wednesday, February 13, 2013

Cook’s Cove, PEI

Our daughter has been spending some time with us while she completes a placement at the Moncton Hospital. It has been just grand having her home for an extended stay, the first time in quite a few years. It is almost time for her to head back to school for the next gruelling portion of her MA in Physiotherapy, so when she isn’t working, we have been busy with a few activities. 


In between snow falls we made a day trip over to PEI to visit with Dad and the rest of the family. And whenever we go to the Island, a trip down the hill to the beach - no matter how quick - is a requirement. We are drawn to the ocean and the beachside; salt air is essential to our being.


Our cove continues to change with the years. Again this winter we are seeing much erosion of the the two points that define our beloved “Cook’s Cove”. The elements play havoc on the sandstones and claystones, both easily erodible sedimentary rock. With the growing natural erosion of the past few winters from an increased number of storm surges and higher tides, we are seeing more fine soft sand that PEI is known for. Such is the price we pay for our sandy beaches.

The south shores, which are sheltered by the Northumberland Strait, are eroding at an average of 1.6 feet per year, where some areas of the north and west shores erode up to 6 feet per year! 

These are “brown”sicles as the sandstone drips via natural springs down the cliffs.
Gotta love that red sand! 
It was so sheltered and sunny, we all felt we could have just jumped right in! I told Simone to go first.....
With its warm waters, soft sand and sandbars that stretch to the horizon line, we have spent many happy hours in all types of weather on this beach. I remember my whole family spending mornings scouring the beach for sea glass. I remember my Mom calling my girlfriend and I to come and eat, and the two of us racing back to the water, sandwiches in hand. I remember lying in the hot pools of water between the sandbars, after our imaginary clipper ship had gone down off shore, stranding us in the "New World". I remember when our leisure craft did go down in a huge storm and we had to try to dig it out! I remember my children being so played out after a full day of swimming and running on the sandbars in their Uncle Gimmie’s mazes that they fell asleep headfirst into their dinner plates. I remember sand castle contests. I remember the neighbours calling us because our three legged dog was bobbing around in the water for hours on end and they were afraid he might drown. I remember my Dad rescuing our toboggan from the ice floes when it got away from us and all of us holding our breath until he landed safely back on the beach.

I always sigh when I step onto the sand. It’s home. 


Friday, February 8, 2013

Shades of Mauve

The last two quilts I have completed on my Millennium have been tops I made several years ago. Several meaning quite a while ago.....It is great to get them off the shelf and finished up. That is my motivation-to get projects done and to use them as learning tools at the same time.

This card trick quilt is the largest top I have loaded on my longarm to date. I quilted it in an over all freehand pattern of cabbage roses that I am developing. I quilt the flower and leaves and then echo quilt them with some swirly little twigs, quilting each as a unit. I used Glide Cotton Candy in both the top and bottom threads.


This quilt was quilted with the same thread - and not just because I had wound too many bobbins! This time I used a pantograph - my first! - and learned many valuable lessons in thread tension. I think many of us are hesitant to adjust our thread tensions because it feels like we are wandering into the unknown, but it is just something you have to get comfortable with. When I did get the correct tension, the rest of my quilting was effortless, undoubtedly a great feeling!


 The pantograph I used was from The Ultimate Guide to Longarm Machine Quilting . There are a variety of designs in this book which I have found appealing as I learn which style of pantos I am most comfortable with. It is a simple procedure to copy the designs at the size you want, tape them together and use them on your longarm bed. As I grow more comfortable with  quilting from the back of my machine, I can see trying at least several more from Linda V Taylor’s book.


Wednesday, February 6, 2013

Stitches that bind

I am not the knitter in our family. My sister knits for her very successful etsy shop Mad About Colour and our Mom had been the manager of the local Wool and Yarn Shop. Mom continued to knit over the years and often helped Jo out. I can knit, but it is only lately that I have taken up my needles once again with vengeance. 

Along with working my way through numerous half or partially finished projects that I am dedicated to completing, I need to keep smaller projects close at hand for those empty moments. I had been working on a pair of socks for my son for a very, very long time and Mom had wondered if I would ever get that toe on the second sock finished. I have a terrible habit of writing notes that I am sure I will be able to transcribe months (maybe years?) later, and then, of course, I can’t. It takes me ages to try to figure out what my notes mean and why I can’t seem to replicate the first sock. 


Well, something finally clicked and the original pattern became reasonable. I had somehow convinced myself that the yarn company had made an error and I had to adjust the pattern.....I am shaking my head as I write this.....Anyway, I did finish that pair and went on to complete the blue striped pair pictures above for Gabe. I also knit two pairs of socks for my sister, a pair of mitts for my daughter, the hat pictured above, plus one for my sister, and that cute pair of mitts in the upper right corner are for my little grand niece! I have a matching pair for her Mom on the needles now (I thought since the yarn was so pretty and festive that a little mother/daughter matchy-matchy would be fun!). And as soon as my son sends me a scan of his hand, I will start a pair of mitts for him.

Mom and I cuddled up in her big bed, knitting and watching the Home and Garden Channel.
I still haven’t finished binding those two quilts. And I am only half way through the latest quilt on my longarm. But, like many of us who work with our hands and create with our hearts, I need to keep a lot of irons in the fire and I need to mix it up, working in a variety of medium. Inbetween the knitting and the quilting, I am working on designing pantographs, some fabric painting and some quilting on my domestic. As well, my sister and I are in the very early stages of collaboration on a project which threatens to be loads of fun and a whole new avenue to explore.


Monday, February 4, 2013

Spaced out on pantographs

One thing about quilting for yourself is that you end up having a lot of binding to sew on. I am currently finishing two quilts right now - one I quilted with a freehand design and the other is my first pantograph. For anyone unfamiliar with the term, a pantograph pattern is a to-size pattern that you lay at the back of your longarm. Using a laser, you trace the panto from the back while your machine simultaneously stitches this pattern on your quilt at the front. It can also be referred to as edge to edge quilting.

When you buy an APQS longarm, an assortment of goodies is included: some needles, bobbins, batting samples and a couple of pantographs. The pantos I received didn’t suit the top I was working on, so I photocopied one I liked from a book I had purchased, taped the pages together and stitched away! The next top I have chosen to quilt is a space themed quilt that I made with artwork created by my children when they were very young. They drew space pictures with discharge dye paints and I built on a selection of these drawings to create a top. As always, I had great intentions at the time. Somehow time got away from me and it has languished on a shelf ever since. This seemed as good a time as any to load it on my machine and get it done.

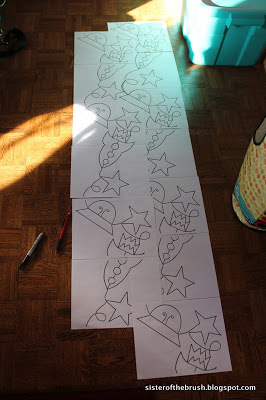
Since I had just successfully used a pantograph and was happy with the results and the time invested in quilting, I decided I would use one for this quilt. All good practice! I am not sure how panto designs are generally created, but this is how I created mine. I drew some space objects in pencil, cleaned them up with sharpie marker, created a flowing design with these elements on two pages. When I was satisfied that my design did indeed flow and could be continuous line quilted, I photocopied the pages and then built up my design. To make sure I had good design spacing with balanced negative space between the rows, I laid out the pages so that I could adjust the design if necessary. I did have to make one adjustment which I made on all necessary pages with a different colored marker.

The placement of the second row is only for design purposes at this point- I am studying the positive and negative areas for design flaws


Tomorrow I will start the quilting as an alternative to sewing binding on. I am looking forward to seeing how well my design quilts up.

Friday, February 1, 2013

Mapping it out, step by step

I have to admit. I am pretty pumped. I just called my husband and my Dad and emailed all my other special people. I learned that my piece, “By the seat of our pants” was chosen as a finalist in the Quilting Arts “Map it out” Reader Challenge. Yep, I am pleased.....

I had a lot of of fun making this piece and it feels strange to be so excited, but it feels good, too. Thanks, Quilting Arts!