That little side trip to Vermont whetted my appetite for fabric painting, so I squeezed a day of play into my busy retirement schedule. As is my habit, I gathered my supplies and tools needed to work on some prototypes for a larger piece I have in progress. And then I proceeded to set up for sun printing. I do that all the time..decide I am working in one technique and then change midstream and start another. This probably drives others (read: husband and offspring) a bit crazy, but it seems to work for me. I am running one process through my head, all the while getting another process set up.
Well, it turns out I picked an A-1 day for sun printing! The tools are basic and the process is easy and fast. I used PFD (prepared for dyeing) fabric, a couple of Setacolor Soleil Paints I had, some wide bristle and sponge brushes, a spray bottle, a piece of foamcore covered and sealed with plastic wrap, some painters tape and a handful of coarse salt.
 Then all I needed were objects and materials to print. I collected some leaves, grasses, weeds, some plastic doilies that had been my Grandmother Robertson’s, some buttons, coins and chain.

After cutting my fabric to the size that would fit on the foamcore, I ironed it and taped it in a few strategic spots onto the board so that brushing paint on it wouldn’t be tedious.
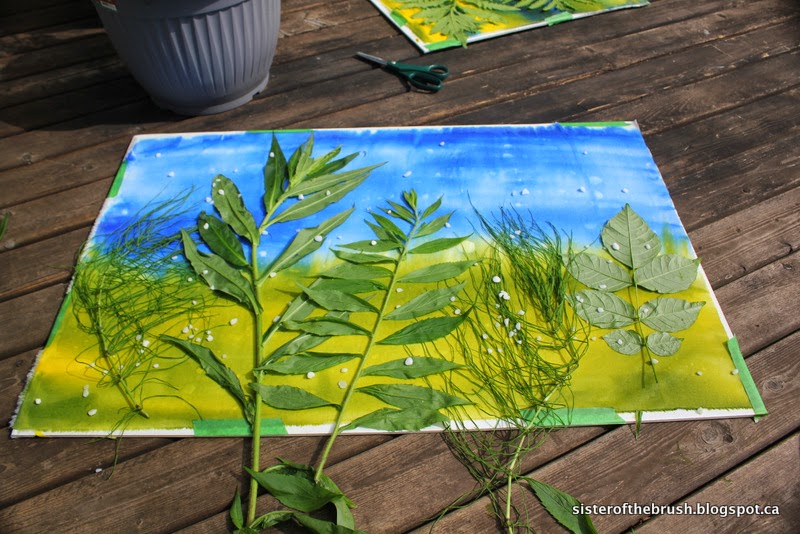
I sprayed my fabric to the extremely technical point of “very wet” and then started brushing paint on. If you don’t have Setacolor Soleil Paints, you can use Setacolor Transparent Paints watered down in a 1:1 ratio.
If it is really sunny and hot, you need to do these steps fairly fast because your paint will dry quickly. This did happen to me several times and I just gave my fabric a spray of water and I got another effect doing so.

Once you have your paint on, then you pick your items to print, lay them on top of the painted fabric and press them into the fabric. This is also when you can toss the coarse salt over the fabric for added effect.

Then you wait for the paint to dry, which on a beautiful sunny day, doesn’t take any time at all.

Once your painted fabric is dry, remove the objects and materials you used to print, remove the tape and then using a hot dry iron, press your fabric. It’s now heat set, pressed and ready for use! Fun, fun!


Today at Blossom Bake and Create blogger Lynda has a great post with links to even more information about preserving botanicals for use in printing. It is an excellent post and I am anxious more now than ever to get collecting some grasses and leaves to preserve for future surface design sessions.
I am linking to The Needle and Thread Network.
Well, it turns out I picked an A-1 day for sun printing! The tools are basic and the process is easy and fast. I used PFD (prepared for dyeing) fabric, a couple of Setacolor Soleil Paints I had, some wide bristle and sponge brushes, a spray bottle, a piece of foamcore covered and sealed with plastic wrap, some painters tape and a handful of coarse salt.
After cutting my fabric to the size that would fit on the foamcore, I ironed it and taped it in a few strategic spots onto the board so that brushing paint on it wouldn’t be tedious.
I sprayed my fabric to the extremely technical point of “very wet” and then started brushing paint on. If you don’t have Setacolor Soleil Paints, you can use Setacolor Transparent Paints watered down in a 1:1 ratio.
If it is really sunny and hot, you need to do these steps fairly fast because your paint will dry quickly. This did happen to me several times and I just gave my fabric a spray of water and I got another effect doing so.
Once you have your paint on, then you pick your items to print, lay them on top of the painted fabric and press them into the fabric. This is also when you can toss the coarse salt over the fabric for added effect.
Then you wait for the paint to dry, which on a beautiful sunny day, doesn’t take any time at all.
Once your painted fabric is dry, remove the objects and materials you used to print, remove the tape and then using a hot dry iron, press your fabric. It’s now heat set, pressed and ready for use! Fun, fun!
Today at Blossom Bake and Create blogger Lynda has a great post with links to even more information about preserving botanicals for use in printing. It is an excellent post and I am anxious more now than ever to get collecting some grasses and leaves to preserve for future surface design sessions.
I am linking to The Needle and Thread Network.


.jpg)
.jpg)
.jpg)
.jpg)
.jpg)
.jpg)
.jpg)
.jpg)
.jpg)
.jpg)
.jpg)
.jpg)
.jpg)
.jpg)
.jpg)
.jpg)
.jpg)
.jpg)
.jpg)
.jpg)
.jpg)
.jpg)
.jpg)
.jpg)
.jpg)
.jpg)
.jpg)
.jpg)

