I come from a long line of sign writers and am happiest with a brush and some paint! Add
paint to fabric and I get really excited!!
Showing posts with label design. Show all posts

Thursday, July 31, 2014

Kaffe Fassett, We Meet Again!

In 1975 my sister Joanne, of Madaboutcolour fame and I boarded a plane with backpacks and dreams and found ourselves in England. Being maybe a little bit hippie and a lot dedicated to handcrafts, we focused our adventure on design, museums, live theatre, buying up wonderful items like Birkenstocks for 25.00!!(me) and corduroy jumpers and skirts at Selfridges (Jo). We spent a full week going to the Victoria and Albert Museum where time stood still for us to sketch (Jo), wander and soak it all in (me). We stayed in hostels, cheap rooming houses, B&B’s, and gathered stories as we experienced life on the road. We saw sooo many theatrical performances! Chorus Line, Agatha Christie’s The Mouse Trap, Swan Lake (for perhaps the 10th time....growing up on PEI with the Confederation Centre and its focus on live entertainment meant we had the opportunity to see lots of ballets), and Jesus Christ Superstar to name the most memorable.

We also visited a small shop in downtown London to see an interesting display of knitted items. I remember there weren’t an overwhelming number of pieces, but each piece there demanded your attention. Machine knitting was something I was just vaguely aware of and fashion design in these days before the immediacy of the internet, was something you saw in magazines. Joanne, being very smitten with the work we saw, bought a beautiful hand knit vest, it being the one article she convinced herself she could afford. We chatted with the proprietors/artists, no doubt gushing over the amazing designs..

I am not really sure when the pieces all began to fall into place, but on July 18th, in a little church in Amherst, Nova Scotia, Joanne stood up and showed Kaffe Fassett one of his earliest knitted vests, designed by his then partner, Bill Gibb. And the circle grew even tighter; she also presented Kaffe with a photocopy of her Scottish born husband and Bill Gibb in a class photo taken when they were both youngsters, attending the same school, sharing a desk. Kaffe very graciously accepted the photo and seemed pleased and intrigued to see a piece of his early work. He listened as Joanne explained that Bill and her husband had been close school friends and had spent hours preforming plays Bill made costumes for.

After Kaffe’s talk, he patiently chatted and signed books for attendees. He signed several books of Jo’s extensive collection of Kaffe books and again thanked her so kindly for her thoughtful gift. I remarked that he didn’t look a day older than the first time we spoke, way back in 1975 in that little showroom  on Bond Street..

Tuesday, July 22, 2014

Flowers and Hearts Church Fund Raiser Quilt

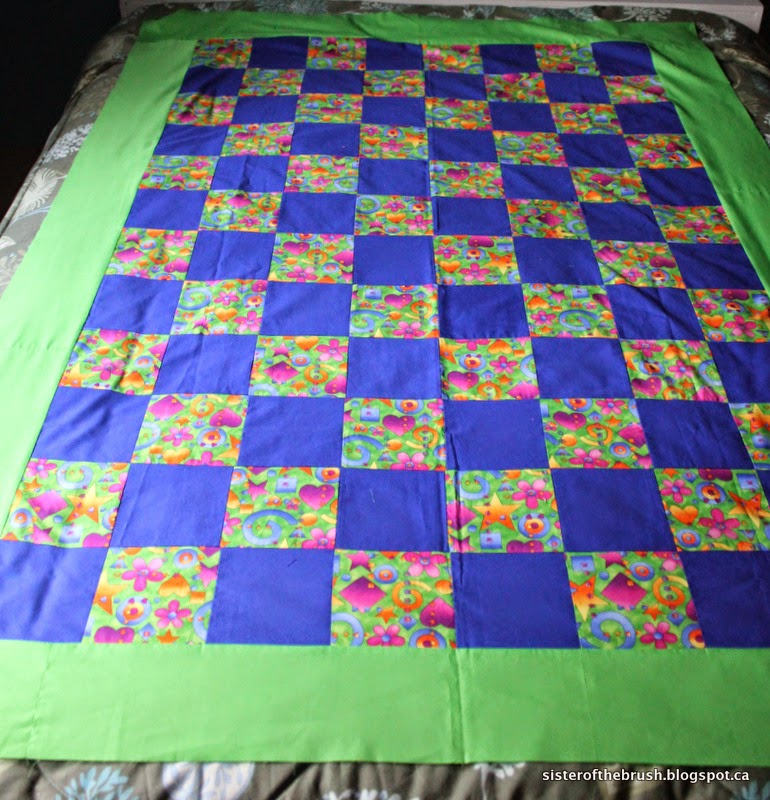
This is a lap quilt a local church group pieced for a fundraiser this fall. They were going to tie it, but when I heard about their project, I offered to quilt it because I thought they might be able to raise more if it was quilted.
The before photo


They allowed me to quilt as I chose, so I picked a couple of design elements from the fabric and used those to quilt in my free styling, makes me happy way.
I assumed some lucky little girl would end up with this cute little quilt, so I quilted flowers and hearts in an all over pattern. I used my favorite Glide thread top and bobbin and used a wonderful shade of green called “Turf".
I received a lovely thank you card from the St. John’s U.C.W., so I think it met with their approval.
The finished quilt before binding.

I hope they are able to generate a nice tidy sum in their fund raising efforts.

Monday, July 14, 2014

Scrappy Log Cabin Variation - A Client Quilt

This lovely scrap quilt started out much larger than the size it is here. Sandra reconsidered its dimensions, took it back home and the second time I had it to quilt, it was somewhat reduced, though still a generous king size.
Because there were two distinct color ways in this log cabin variation, I wanted to use matching thread for each section as opposed to an all over design in one color of thread. So, in order to achieve the look I wanted, I stitched in the ditch around the off-white sections and then quilted the two sections separately, but always using the same color bobbin thread.

This meant the quilt was rolled and re-rolled several times, but I feel the result was worth the time and energy.
I quilted a free style flower, leaf, swirl combination in the dark logs and then stitched a smaller leaf design in the off-white, lighter sections.

I purposely left space around the ditch lines because I wanted to maintain drape and avoid having the quilt become too stiff.
There were quite a few hours put into this quilt between Sandra and I, but I think we both feel the result was well worth the extra effort.

Saturday, June 21, 2014

A Client’s Beautiful Batik Floating Star Quilt

I love being given free reign on the quilting on a client’s quilt. I absolutely love free styling a quilt top!
This lovely floating star was a blissfully beautiful quilt to work on.
Each wonderful block was made with a different batik fabric and I just so enjoyed admiring each one as I quilted the top.


Claudette did a great job piecing this large top (96 x 106) but unfortunately I really couldn’t get a photo of it in its entirety. Weather and my circumstances made it necessary to keep it inside to photograph.


If summer ever does arrive here in the east, there will be many shouts of graitude. For now we try to make ourselves feel that a high of 17 degrees really is warm and that the rain is refreshing. Meanwhile I wrap myself in three layers and dream as I quilt as to where we can go this winter that is hot and dry. And that is hosting a quilt show, of course!


For those who might be interested, I quilted this with Omni thread on the top, a polyester thread from Connecting Threads in the bobbin, and Claudette provided me with a Quilters Dream Cotton Batting. 

Thursday, June 12, 2014

Freehand Quilting

I find myself in the very fortunate position of having a number of comfort or charity quilts to stitch. These lovely quilt tops give me the opportunity to learn as I go and to practice my own longarming designs. When I am faced with a client’s top and I am still not completely sure what approach I will take, I load one of these tops on my machine and stitch away. It is always interesting because I often have an idea of what I will be quilting and then when I start, well, what I stitch is usually nothing like what I have been sketching out and practicing in my cool and handy Wipebook my sweet daughter gifted to me.
This time I did stick to my plan and I am especially pleased with this design. I love being in front of the needle on my longarm. In some ways it reminds me of my days wielding a brush and letting the paint flow!

This design is one I randomly stitched on a sampler with while at Road to California and I was itching to take it a step further and develop it into a full edge to edge freehand design.
I always tend to try to fill every space and I working to learn the fine art of less is more - for some quilts! I think it has a lovely, casual feel and yet maybe is a bit folksy as well.

Friday, May 16, 2014

Feathers and Freehand Quilting

It seems that most times I am told, “ do what you want,” when asked to quilt for people. And that is what I love to hear because it gives me free reign to quilt as I choose.

This lovely quilt is one of those wonderful projects where I had no set parameters and no limitations. Claudia pieced this top at our local guild retreat, using a variety of fabrics including Stonehenge fabrics by Northcott.
She asked me to order a wool batt and for the top thread, I used a Superior Rainbows variegated thread I purchased at Road from Dr. Bob whose sage advice when I asked about it was, “Try it. You’ll like it.” I have to admit, I was hoping for a bit more info, but he was right, I do like it. I used a Glide thread in the bobbin, one of the spools the Gammill folk included in their goody bags for class participants.
I felt this quilt needed feathers as well as places for the eye to relax so I quilted feathers in the outside borders and triangles and did some freehand work in the blocks and inside border. My feathers are a work in progress and I seem to have found my style when I practice and then lose it again when the quilting gets serious..lol I am going to keep working at them because they are actually fun to quilt.

Sunday, April 20, 2014

A refreshing breath of spring air in a customer's quilt

It felt fitting to quilt this beautiful top as the snow fell and while I was wishing and hoping for spring to hurry up and arrive!
My friend, Maureen did a lovely job appliquéing and piecing the top for a customer and I was lucky enough to get to quilt it.
Originally we had discussed some pebbling or cross hatching in those flower centres but as I worked on it, I quickly realized it wasn’t required.
So I stayed with my meandering leaves and loops with bead board on the two outside borders.

I used an neutral shade of my favorite Glide thread for some added sheen. I am very happy with the result and more importantly, so is Maureen.

Sunday, January 26, 2014

SAQA 2104 Anniversary Trunk Show piece

Getting projects completed makes anybody feel good. I love seeing a project through to completion and when I get another one checked off my list, well, yahoo for me!

I am working very diligently at revamping my approach to shows and exhibitions. My new attitude is basically, why not? I have no burning desire to compete, but I am also feeling it is okay to be included. So, when the call came out for the SAQA 2104 Anniversary Trunk Show and our Regional Rep reminded us that we should all be involved, I made a concerted effort to get a piece done. Besides, the piece is only 7 x 10; I could fit that into an already overfull schedule. Why not?

So, I created my little art quilt using another little sketch I had waiting for the time I needed to get it onto fabric. It is painted, fused and beaded following the same procedure I outlined in my last post. A recent purchase of a WHOLE ROLL of Mistyfuse..be still my heart!...is going to make working on pieces such as this an absolute dream. New beading needles and thread are also going to help. 

I mailed my piece off and as I did, I got thinking about how maybe I did need a new word or phrase as guidance for my year. Maybe I do need a controlling factor to my days. So, I think I have found it...why not? Why not indeed!

I'll let you know how it goes..


Tuesday, January 21, 2014

My piece for the SAQA Atlantic Trunk Show

The SAQA Atlantic group has a travelling trunk show and each member is invited to include a piece representative of their work for inclusion. Completing a piece has been on my to do list for far too long and last week I set out to finally get mine done! I had a little sketch from way, way back in mind to use, and to be honest, it was an absolute pleasure to finally see my idea "materialize".

I like to use fabrics I create myself in my personal pieces. Using a combination of Seta opaque and transparent paints as well as Jacquard metallics, I happily painted white cotton yardage, creating a palette of fabrics to work with. Sparkle was added to the snow, water and sky pieces with some brush strokes of glitter fabric paint.

When I build a piece like this, I use a fusible webbing ironed to the back of the fabrics. Then I cut each piece, adhere them to a base and press them with a hot iron. Straight stitching further secures the layers together. Any time I can add embellishments is a plus in my books and this piece has some beads. The edges are left unfinished because it will be mounted between two layers of mat board and slipped into a clear plastic sleeve. Finished measurements are 8 x 8 inches.

The scene I have created is one my family and some close friends will recognize as Cook’s Cove, PEI. The land there is ever changing and I have taken some liberties in my interpretation, but to me it is a view forever on my mind..

Wednesday, January 15, 2014

Margaret’s Quilt Finished!

Another quilt completed! This one belongs to Margaret and she gave me free reign on whatever quilting design I wanted to stitch on her top. I felt her pattern warranted an overall design and since I really like stitching my cabbage roses, off I went! I used black thread on top and bottom and I think the design shows up equally well on both sides.


Saturday, November 23, 2013

Longarm Design

I have learned that the most comfortable way for me to quilt on my longarm is best represented in the photo below. I have my design nearby where I can refer to it as needed and I use one of a selection of chalk pencils to mark my design onto the top. I find chalk wipes away fairly easily with a cloth (or the corner of your sweater..) and I am still not completely won over by the idea of using a marker on my quilts, even if they do disappear with water or heat, depending on the brand and style of marker. 
Generally if I am stitching the same design repeatedly across the surface of the quilt, I might sketch in the first few and after that, I eyeball the balance. This gives me control of the surface design, yet freedom to use the space as I quilt. I can alter the size, the direction and extend my design to fill in the odd spaces that might occur and be awkward if I left them unstitched. And I have to admit, I love using what I call my “cabbage rose" design. I have quilted several quilts using variations of my pattern and all have been well received. 
I also keep a whiteboard near by so I can play with directions and thread paths.  If I happen to create a design I think I would use again, or that I might want to develop further, I take a photo or two of it for future reference. No wonder I have almost 20,000 photos on my hard drive. I take soooo many photos..

I do enjoy the ease and speed of using pantographs, and I also enjoy ruler work. Feathers are the bane of my existence right now, but some upcoming amazing classes with some incredible teachers will hopefully cure me of my hesitation. I quilt feathers. I just don’t love my feathers. I plan to fix that for good!

Tuesday, November 5, 2013

Covering journals

I like my journals covered, and it turns out there was a simple way to achieve that without taking a huge chunk of time. These days it takes a while for the lightbulb to pop on inside my head and I would like to think it is simply because I am so busy that the obvious just isn’t obvious. But, really I believe that little voice of reason and sensible solutions has been silenced and left me to figure this stuff out on my own.

While working on something else and pondering how I could make some covers, I glanced at a stack of discharged and batiked fabric on my shelf and suddenly was struck by the idea that perhaps the fabric in itself was enough.

Turns out I was right.

The small journal is covered in a piece of black cotton discharged with bleach which I squirted out of a repurposed mustard bottle. The other was covered with fabric made with a black cotton base on which I freehanded leaves with soy wax and then painted with multiple colors of opaque fabric paint. Once dried I removed the wax to reveal the black outline. This requires a fair amount of elbow grease as the wax is well covered in paint. This results in a fabric with a fair amount of weight which is exactly what I wanted - a fabric with the substance of a suede or leather. I also used some red had dyed fabric for the inner pockets.

Done and done!

Weekend away


After a full work week, I packed and headed to the first ever SAQA Atlantic Retreat.

The weekend was an action packed exchange of information and meeting of minds. Things have certainly been altered forever in my little universe.

Thursday, October 31, 2013

Customer quilts

Recently I had the pleasure of quilting these two lap quilts made by two local quilters. They had chosen backs of Fireside, which is what I refer to as the country cousin of minky - it is isn’t as long a fibre and is looped rather than straight. But, you have to be on your best behaviour when you work with it! Besides the bit of stretch, it also creates a bit of dust and lint. But, it makes a soft, cuddly quilt - perfect to curl up in these cool fall nights.


I am still struggling with finding the best place to photograph quilts so there are some color variations on these shots. But, you get the idea.


I quilted beadboard on the borders of both and then had fun with some freehand continuous quilting in the centre. There is a bit of ruler work in the second one in order to make those smooth circles.