I come from a long line of sign writers and am happiest with a brush and some paint! Add
paint to fabric and I get really excited!!
Showing posts with label dyed fabric. Show all posts

Thursday, November 7, 2013

Mug rugs

Everyone attending the SAQA Atlantic retreat brought gifts and goodies to give as a thank you gift to our two retreat organizers. There were lots of yummy threads, ice dyed fabrics, hand dyed fabrics, bits and pieces of personalities tied up in luscious yarns and ribbons. 

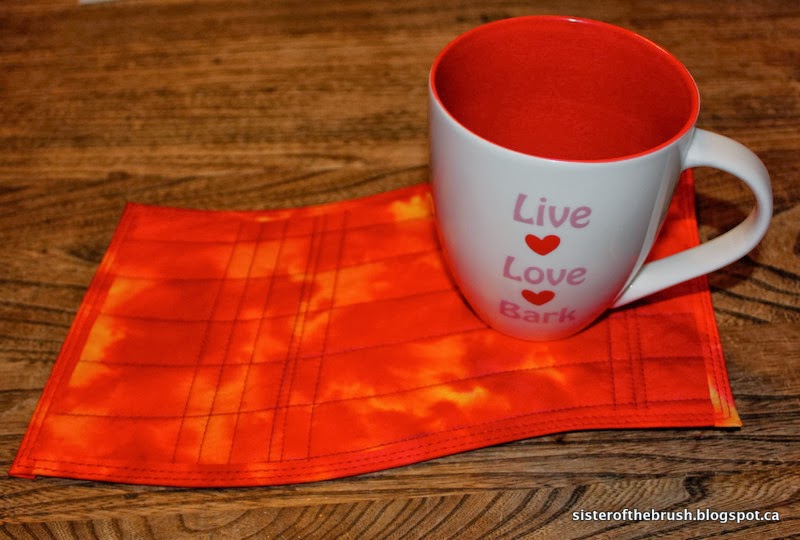
I couldn’t get the image of a magic carpet out of my head. And a mug of something hot (warm..) is always beside me, so I opted to make each a mug rug in what I perceived to be a flying carpet shape using some of my hand dyed fabrics. I added a mug that could hold a reasonable portion of a soothing beverage and my favorite, a piece of maple cream from our local Farmer’s Market.


I have to be honest so full disclosure here - I didn’t even know what a mug rug was until a few months ago. But, now the idea of a perky little pad to protect my surface from spills and drops and one that is big enough to hold a mug and a snack makes a lot of sense to me. 

Today I am connecting to The Needle and Thread Network.

Tuesday, November 5, 2013

Covering journals

I like my journals covered, and it turns out there was a simple way to achieve that without taking a huge chunk of time. These days it takes a while for the lightbulb to pop on inside my head and I would like to think it is simply because I am so busy that the obvious just isn’t obvious. But, really I believe that little voice of reason and sensible solutions has been silenced and left me to figure this stuff out on my own.

While working on something else and pondering how I could make some covers, I glanced at a stack of discharged and batiked fabric on my shelf and suddenly was struck by the idea that perhaps the fabric in itself was enough.

Turns out I was right.

The small journal is covered in a piece of black cotton discharged with bleach which I squirted out of a repurposed mustard bottle. The other was covered with fabric made with a black cotton base on which I freehanded leaves with soy wax and then painted with multiple colors of opaque fabric paint. Once dried I removed the wax to reveal the black outline. This requires a fair amount of elbow grease as the wax is well covered in paint. This results in a fabric with a fair amount of weight which is exactly what I wanted - a fabric with the substance of a suede or leather. I also used some red had dyed fabric for the inner pockets.

Done and done!

Tuesday, August 13, 2013

A little project


In the few minutes I find here and there, I made a cover for the new sketchbook my friend, Nancy picked up for me at Barnes and Noble on our recent trip to Maine.
Since I had all these stamped bits and pieces to chose from, I decided to incorporate one of my stamped raspberries with some of my hand dyed fabrics. I wanted to embellish the cover a bit more, so I used Shiva Paintsticks to rub a leaf design on both back and front.
I made a pocket on each side for the covers to slip over and know they will stay put.
I also painted a one inch wide strip and fused and stitched it to the front for more interest. I used some shiny thread I had and finisheded by adding a charm and a bead.  And there would be no chance I would be sewing those on! I used my handy dandy E-6000 to glue them in place!

There won’t be any awards given out for my design and execution, but I like it and I think it adds some class to my stack of sketchbooks and moleskins.

And in our “Tomato Talk” corner, because I know everyone is simply itching to know how mine are doing, don’t these look yummy!

Friday, August 2, 2013

Basil. How do I love thee.

I was a slow convert to computers. As I began to realize the wealth of information available, I was quick to jump on board the blog bandwagon! As a fabric dyer, surface design person - a person of fibre - there was not a lot of info readily available in my immediate neighbourhood. As I found more blogs written with my fabric needs in mind, I gathered my favorites and either followed along, signed up for email updates, or in a lot of cases, just stalked. In a good way, of course.

Not everyone stays on topic all the time. That is the great thing about these online journals; many are written for a variety of reasons. Some authors are building a business and using all avenues of social media; some are kept so family living everywhere and anywhere can keep up; some simply like documenting their daily/weekly lives. Many turn their blogs into photo books! I would have loved this when my kids were small. Keeping a hand written journal just wasn’t for me I discovered, but the instant gratification of writing an entry and posting a photo or two of my growing kids and their daily antics would have been gold in my books! 

One of the bonuses I have discovered is that a lot of blog writers share their successes. All kinds of successes. Like recipe successes!

A couple of years ago I while reading a blog called Tommy the Material Girl, I was very interested in her yearly pesto making. I was intrigued that anyone who purposely work pesto making (in quantity!) into their summer schedule. So intrigued, in fact, that I never forgot. This year I decided the time had come to follow suit!

I have basil growing on my deck every summer and add it to just about anything and everything. I have eaten some this morning and will have it again in whatever I concoct for supper(...basil with eggs, add it to salad, margarita pizza, basil biscuits.....). This year however, I had a more formulated plan. I bought two plants already started and then started about 30 or 40 plants from seed. 

This morning I made my first pesto!! And it is delicious.....
I am freezing some and have kept a bit out to share with my hubby tonight. Maybe. Depends what time he gets home..


I won’t lie. I cleaned the inside of the blender with some bits of rosemary bread to get the last drops. And think what you will, I licked the blender blades clean. It’s that good.

So, thanks, Tommy! I really appreciate you sharing of your recipe. And I am so glad I gave blogs a chance.

Wednesday, July 31, 2013

Stamping out those urges to clean!

I feel like my house is falling in ruins around me. I have piles of my “stuff”, my creative play tools and materials, everywhere. I have to be careful when I let this happen because eventually it eats at me and then I run in circles tidying and not accomplishing anything creative at all. I purposely refused to schedule any more paying work this week, just to let myself have some creative time. This is also the time when popcorn can be an entree.....

Although I am biting at the bit to finish a quilt on my longarm, I have been doing anything but. I have managed to fill my hallway with piles and piles and tubs and tubs of fabric, all in a feeble attempt to organize, or perhaps integrate the new fabric purchases. I like to mix my fabrics up. That way the newer is not playing so much on my conscience if I don’t see a stack of new stuff shining bright as a new penny (remember those? I loved pennies!). Maybe that is why I always rush to pre-wash my new pieces. Makes me feel like they have been here longer. For whatever reasons, I am organizing. Well, sort of. It should be organized when I am done. I hope.

I have sewn some bindings on so that I have some handwork, if I should happen to remember how to turn my TV on. Don’t ask. I am not technically savvy.

I also started some blocks that I have been wanting to try since my Mom gave me a lovely quilt book last summer. I have some 30’s prints and I love 30’s designs, so it seems I should get myself in gear. My biggest problem is that I am not so great at making repeat blocks. Case in point? I made one and stopped. BUT, I am planning on making more. Just not today.

I have also been sketching. I am a summer sketcher. Maybe it is the light. Maybe it is easier to sketch when you aren’t wearing 3 sweaters and gloves. Anyway, I am doing some of that. And when I was cruisin’ through my moleskin, I apparently was “drawn” to a little flower sketch I did two summers ago. Without really thinking about the process, I replicated it on a piece of Soft Kut and made a stamp. All of a sudden the morning had passed and I have a nice little stack of stamped bits and pieces.


I refined the stamp as I made prints until I was happy with my design. I decided to not carve the centre but will pop some little stamens in with paint later on. I know I drew this from a flower on my deck but it has a Hawaiian feel  to it to me. 
I also decided to try some other stamps that I had been carving in spare minutes. Good thing I did because sometimes I have a tendency to over carve my design and I had been considering taking the knife to them again. I learned I am happy with them just as they are. Well, for now at least.


Reminds me of a cartwheel. Must have been all that Americana influence on the weekend. And the one on the left is blurry because I overprinted it. The gold I used first was too light so I mixed some Green in and printed again. 


I really like using metallic fabric paints for stamping, especially on my hand dyed fabric. I tend to use two colors on each stamp although the ones above are just one. I used two with the odd star design.


I almost didn’t try this stamp, dismissing it as too simple. Ah, sometimes I need to step back and remind myself of that great creative advice: Simplify, Exaggerate, Repeat.....

Check out The Needle and Thread Network with me and see what’s up with Canadian fibre folk.

Monday, July 29, 2013

Coasting along nicely

I took the starfish pieces I stamped last week and made my sweet Simone some simple coasters. She will have 6 semi-matchy ones stamped on a dark blue fabric and one odd ball stamped on a lighter blue fabric. I am guessing perhaps she can used the oddball for her tea mug when she starts work.
The fabric they are shown on is another piece I dyed. It is from my snow dyeing attempts this past winter. 
I have soooo much thread, yet I don’t have a lot of metallic threads for my domestic. I did manage to find some blue and gold though and did some simple quilting which adds builds on the shine of the metallic fabric paint I used for stamping.
The hand dyed fabrics sandwich some fusible timtex which helps them keep their shape and adds an extra layer for protection against dampness.

Hope she likes them! Surprise, Mony!

Monday, July 22, 2013

Summer Stamping

I keep some sheets of Soft-Kut and my Speedball carving tools next to my ironing board. My iron takes no time to heat up, but I like to pretend it does and in the time I have decided it takes to get hot, I work on hand carving stamps. So, every time I iron a shirt for work, I spend 5 minutes or so working on a stamp. 

This weekend my daughter spent the night with us on her way to her next placement. She came to say good morning to me and saw the materials near the board. As I sat at my sewing machine fixing a blouse for her, she carved a stamp. She hasn’t had much free time in the last 7 years for anything not directly related to school, so it was fun to watch her sit and focus on a random act of creativity.

So, today I decided it was time to collect all the stamps scattered over my work table and try them out. I gathered up some of my hand dyed fabrics and some bottles of fabric paint and headed to the deck.
Have I mentioned how much I enjoy my outdoor studio space?

This was the perfect spot to do some stamping - the sun was now on the other side of the house and there was a slight breeze blowing.

Simone’s starfish stamp!


And because I can’t resist......here is the token tomato photo for the day......
Grape tomatos - coming along quite nicely!

Thursday, July 4, 2013

Some summer projects

The most recent project to come off my longarm is a piece my son designed that I am interpreting into fabric for him. We are creating a wall hanging for his apartment and clean lines appeal to him. So, when it came time to quilt the piece, I stayed with horizontal lines of stitching spaced equally apart. I quilted around each design element as well and that means I have a lot of thread ends to bury. A LOT of ends.

I also sewed up a cushion for my daughter, using her brother’s owl drawing with a minor change in color. I added my dyed fabric to his drawing printed on a fabric sheet. She likes purple so we went with that palette for this cover. I cheat when it comes to pillow forms - I simply cut up full size pillows into the size that suits my covers. That way I am not restricted to the standard commercial pillow from sizes. 

Tuesday, May 7, 2013

Cleaning makes me a little bit owlie

I had nothing but great intentions and a very long list when Friday arrived. I had the house to myself for the weekend and that usually means a very loose meal plan and lots of chick/artsy TV (total confession! I love LA Ink, NY Ink and Pimp My Ride!) as a background to whatever it is I am working on. That kind of schedule and environment gives me lots of time to get my “stuff" done!

After a busy day and armed with yummy beverages, I made a direct path to my longarm. I worked steadily and finished a quilt that had been on much longer than I anticipated. Tired and happy with my progress, I proceeded to fall asleep on the couch cuddling my bowl of popcorn aka supper.....

I still don’t know what happened Saturday. Early on I made my way to the kitchen for a hot cuppa and five hours later I was fully immersed in cleaning said kitchen. I never spring clean. Don’t get me wrong, I do clean. Just not on a regular basis, or following a schedule. My windows got cleaned when my Mom was here and gently suggested she and I should tackle them. Walls get washed when we paint them. Floors? You don’t want to know.

So. It’s clean now. I even sorted and re-organized my spices. This is big for me. I would clean for my Mom at the drop of a hat. For myself? Well, there is always something else that needs doing.

The thing with me is that once I start, the activity grows. I get an idea in my head and I can’t rest until it is done. Ideas I didn’t want to entertain were sneaking unbidden into my head. I started cleaning more of the house....sigh.

So, the weekend went by and granted, a lot of stuff round here sparkles now, but, I did finally manage to give my head a shake, move away from the scrub brushes and mops and back to my sewing machines. Finally I whipped up a couple of cushions for my son using his drawings. I have used my kids artwork in my quilting since they were able to hold pencils, so it feels really great to do this with current artwork! 


I printed the drawings on Jacquard fabric sheets, backed them with fusible interfacing and then added some borders. I found it fairly serendipitous that fabric I painted in the last few weeks was perfect as a border. 

Jacquard offers two methods for securing the color on their fabric sheets. You can rinse out the excess ink with cool water, or use Scotchgard spray to seal it. I tried both and the result is that the owl on the right is lighter in color. Next time I will just use the Scotchgard without rinsing.

Sunday, April 21, 2013

Fabric Dyeing

I think this session of fabric dyeing is over. At least for a few days. I have managed to build up my stash quite a bit and as I worked, I have loosely developed several projects. Thus, I now know what other colorways I need to dye going forward. These will be smaller amounts of each. Or at least, I think they will be. Once I start the process, I just seem to keep adding to the dye pots and all of a sudden I have dyed a LOT of fabric.


I rarely stop at one layer of color on each fabric. If I don’t mix more secondary and tertiary colors and add them in the initial dyeing, I do one of many processes to increase their layers and complexity.

One thing I do is put the fabrics through a second soda ash pre-soak and then over-dye them with a second color or colorway. Usually I will fold them or twist them a different way so that I maximize the base color(s).

Sometimes I discharge dye the pieces by scrunching the fabric on a piece of PVC pipe holding the folds in place with elastic bands and then I paint some diluted bleach on them.


Sometimes I have already used this same process to add layers of opaque paint. And then I repeat the process with a bleach solution. The yellow and brown piece in the bottom left hand picture is one such piece.

The blue piece below is one I painted several very watery shades of blue opaque paint using the PVC scrunching method. After the first dye, it was a very nondescript piece of blue, but now I think it is perfect water fabric.


I had dyed a piece of fabric green by folding it accordion style and using bright yellow and royal blue dye powder. It was exactly what I wanted as a piece to build on. I cut it in half and treated each piece in a different manner.

The piece on the right is what I achieved after the first dyeing. The piece on the left is the other half of the green piece after I scrunched it on PVC pipe and brushed it with a bleach solution. Now the layers of yellow are more obvious.


The piece on the right on the photo below is the result of over-dyeing that green fabric above with red and a small quantity of orange dye. Again, exactly what I was aiming for.


All of these fabrics are now ready to use as it, or to have stamping, stencilling, rubbings, screen prints, etc added to them. I have a few new carved stamps waiting to be tried and there a few favorite commercial stamps that appear and re-appear in my pieces that I will use as well.

I am really hoping the deck furniture can go out soon (please!) so I can set up my outdoor studio area. I love taking my work outdoors and using that wonderful natural light as I continue adding layers to my fabrics.

Wednesday, April 17, 2013

Low immersion

Once I get my dye stuffs out, I tend to want to keep going. I had another lovely session and came up with some great greens to add to my stash. I use Procion MX cold water dyes and a minimum of fuss.

I buy my soda ash in large quantity from the local swimming pool store and use a selection of dollar store mixing cups, dish pans, plastic containers and spoons as my tools. I don’t use salt, or urea, or any fancy soaps for rinsing.


In the past I have used all the suggested accoutrements and have had varying degrees of success with them. I do use urea and salt when I microwave dye and also when I use the immersion method. But right now, keeping it simple is working best for me.


I used a low immersion method for these pieces and let them sit for a good 24 hours before I rinsed them out. I even cut corners on my rinsing methods today - I unfolded each piece and ran cool water over them to get out the worst of the excess dye. Then I let them sit in a pan of cool water to further disperse the dye molecules. Then I tossed them all in the washer, spun them out, rinsed twice in cold water, then washed them twice in hot water.


 I’m pleased with the results.


Am linking to The Needle and Thread Network