I come from a long line of sign writers and am happiest with a brush and some paint! Add
paint to fabric and I get really excited!!

Monday, April 29, 2013

Making Time

By last Thursday I was pouting because there hadn’t been much time in the week for anything remotely creative. I told my husband I was simply tired of being responsible and doing all those adult activities that kept me from playing. To be honest, I didn’t get a lot of sympathy; he laughed. He did joke me out of my crabbiness though. And then I sat at my sewing machine for a few hours and felt balance being restored.

Yesterday I had another pouting/ranting session and this time my hubby cajoled me into taking a walk. I guess he figured I would either talk myself silly about what was frustrating me and eventually bore even myself with the topic, or, I would be so breathless walking and ranting that eventually I would cease and desist. 

Well, between the good company, the beautiful sunshine and his help in arriving at a solution to the issue sending me round the crazy bend, it worked. I arrived home a more relaxed, calmer individual. Thank goodness. That kind of mental state is just not productive. Or pretty.

There have been times in my life when I wondered if I would ever have another original creative thought again; if I would ever come up with another design, idea, thing that I just had to create. A small hiatus from a demanding, all consuming job showed me that physical and mental fatigue definitely served as the firewall to my creativity. But then I found I couldn’t sleep because I had so many ideas popping into my head, most between the hours of 1 and 5 am.

My son works in a demanding, all consuming job. He is a talented self taught musician and has a lovely refreshing drawing style. He is wisely starting to prioritize and find time again for creating and playing music and to also find some spare minutes to draw. I love when my computer or phone pings to indicate he has emailed me another drawing. This is usually in the wee hours as well - maybe the quiet hours are the most creative for this family?

He and I are collaborating on a project or two and one of the sources of my frustration is that I just haven’t had a pocket of time recently that would allow me to make some major headway. And the time I have gotten to work on it has been fraught with taking big......sliding....steps.....backwards. Sigh. 

I did eventually make some headway and I am committed to carving out some hours in the days ahead to devote to the next steps.


Sunday, April 21, 2013

Fabric Dyeing

I think this session of fabric dyeing is over. At least for a few days. I have managed to build up my stash quite a bit and as I worked, I have loosely developed several projects. Thus, I now know what other colorways I need to dye going forward. These will be smaller amounts of each. Or at least, I think they will be. Once I start the process, I just seem to keep adding to the dye pots and all of a sudden I have dyed a LOT of fabric.


I rarely stop at one layer of color on each fabric. If I don’t mix more secondary and tertiary colors and add them in the initial dyeing, I do one of many processes to increase their layers and complexity.

One thing I do is put the fabrics through a second soda ash pre-soak and then over-dye them with a second color or colorway. Usually I will fold them or twist them a different way so that I maximize the base color(s).

Sometimes I discharge dye the pieces by scrunching the fabric on a piece of PVC pipe holding the folds in place with elastic bands and then I paint some diluted bleach on them.


Sometimes I have already used this same process to add layers of opaque paint. And then I repeat the process with a bleach solution. The yellow and brown piece in the bottom left hand picture is one such piece.

The blue piece below is one I painted several very watery shades of blue opaque paint using the PVC scrunching method. After the first dye, it was a very nondescript piece of blue, but now I think it is perfect water fabric.


I had dyed a piece of fabric green by folding it accordion style and using bright yellow and royal blue dye powder. It was exactly what I wanted as a piece to build on. I cut it in half and treated each piece in a different manner.

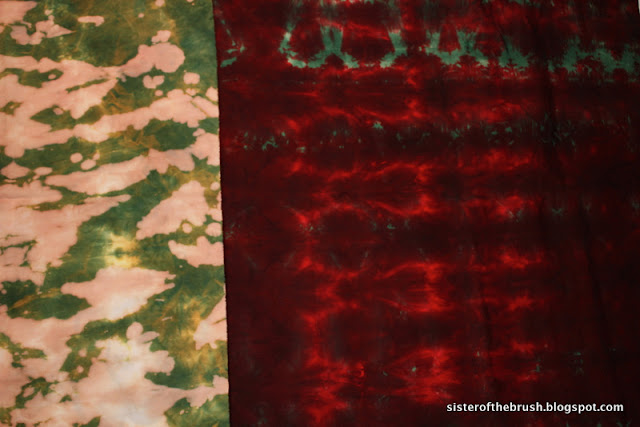
The piece on the right is what I achieved after the first dyeing. The piece on the left is the other half of the green piece after I scrunched it on PVC pipe and brushed it with a bleach solution. Now the layers of yellow are more obvious.


The piece on the right on the photo below is the result of over-dyeing that green fabric above with red and a small quantity of orange dye. Again, exactly what I was aiming for.


All of these fabrics are now ready to use as it, or to have stamping, stencilling, rubbings, screen prints, etc added to them. I have a few new carved stamps waiting to be tried and there a few favorite commercial stamps that appear and re-appear in my pieces that I will use as well.

I am really hoping the deck furniture can go out soon (please!) so I can set up my outdoor studio area. I love taking my work outdoors and using that wonderful natural light as I continue adding layers to my fabrics.

Wednesday, April 17, 2013

Low immersion

Once I get my dye stuffs out, I tend to want to keep going. I had another lovely session and came up with some great greens to add to my stash. I use Procion MX cold water dyes and a minimum of fuss.

I buy my soda ash in large quantity from the local swimming pool store and use a selection of dollar store mixing cups, dish pans, plastic containers and spoons as my tools. I don’t use salt, or urea, or any fancy soaps for rinsing.


In the past I have used all the suggested accoutrements and have had varying degrees of success with them. I do use urea and salt when I microwave dye and also when I use the immersion method. But right now, keeping it simple is working best for me.


I used a low immersion method for these pieces and let them sit for a good 24 hours before I rinsed them out. I even cut corners on my rinsing methods today - I unfolded each piece and ran cool water over them to get out the worst of the excess dye. Then I let them sit in a pan of cool water to further disperse the dye molecules. Then I tossed them all in the washer, spun them out, rinsed twice in cold water, then washed them twice in hot water.


 I’m pleased with the results.


Am linking to The Needle and Thread Network


Monday, April 15, 2013

Quilts for Charity

One of the charity groups that is associated with our guild received a large quantity of tops recently so I volunteered to quilt a few to help out. Due to family and work commitments, I haven’t been able to participate in any of these charitable activities for quite a while so I felt helping out was long overdue. 

The first top was a small size - under 65 inch each side - so it quilted up quickly. I used a lovely swirly pantograph I had used before and some “cornblue” colored thread. It is a fine example of a colorful utility quilt that hopefully will bring a lucky recipient some cosiness and comfort.


The second top was larger and had a very distinct autumn feel I chose an oak leaf pantograph with a taupe thread in the bobbin and a warm brown on the top. 


Both were great practice and I really enjoyed working on them. It felt great to get some tops on and off my machine.


Friday, April 12, 2013

Spacey

Over the years I have incorporated much of my childrens’ artwork in my own. When they were quite young, I took a class in Halifax hosted by the Mayflower Guild and in the class we covered using disperse dyes as transfer dyes.

The instructor was kind of a bust, disorganized, very dismissive of our efforts, actually everything you don’t want an instructor to be. The organizing committee was horrified. We made the best of it and all ended up coming home with lots of dyes to try on our own using some basic instructions. The thing about these dyes is that that only work on synthetic fabrics. 

I had my kids complete some painting on newsprint and then I transfer heated these to some poly broadcloth. Outer space was their theme! I then used the resulting blocks to piece this top. Lucky for me I hadn’t had time to quilt it so there was, ripe for the longarm!


I enjoy piecing my backs as well, even as simple as this.....


I used a bright orange thread from Fil-tec for top and bobbin and had fun with some freehand stitching. Best of all, it is finished!!

Thursday, April 11, 2013

Color Abounds

I love when a dyeing session surpasses your expectations! This is fabric I picked up at G&S Dye on my last visit in Toronto. I was looking for PFD fabric, but the girl was unable to answer any questions about the rolls of fabric in their storefront, so I just took a chance and bought what I thought was a reasonable weight and weave. I used it for my abysmal snow dyeing attempt and then kind of forgot it was on my shelves (which actually means it was in a pile beneath other fabric that was acquired after....but, I sort of remembered it was there.....anyway.....). Yesterday I was over-dyeing a piece and without thinking, ripped off a few metres, scoured it and soaked it in a soda ash solution. Then I just starting playing. For me that is often the best way. No pre-planning, no intended result, just folding and scrunching and twisting and smooshing. 

I am happy with my results and of course, see the trend in my color choices. 


Monday, April 8, 2013

Photo of the day!


I was thrilled to discover today my Instagram photo of my crocuses was chosen as #destinationnb’s photo of the day! My Mom and I planted these crocuses many years ago. And dug them up many years ago! Each year there are a selection that still come up and honestly, it makes me happy when they do. I am so glad we missed those few bulbs when we did our transplanting. Even though the weather here is still less spring-like and too wintery for me, the south facing hot spot at our front door is a lovely little oasis of white, yellow and purple crocuses nestled in amongst the equally hearty hens and chicks.

I love Instagram for the same reasons I love National Geographic and Canadian Geographic.....I get to see the world from my armchair. Viewing the world from other folks' perspectives constantly renews my appreciation of it. It also makes me very itchy to hit the road and get to see more, more, more.....so much to discover, so many photos to be taken!

Wednesday, April 3, 2013

Text Me! Not

So now that I know my pieces were not accepted in the latest Quilting Arts magazine Reader Challenge, I feel comfortable showing them here. The theme was “Text Me!” and I really enjoyed creating these. I have them nearby so I can enjoy the warmth they bring me. Funny thing about being rejected, or not chosen; I know they set guidelines for their publication, but when push comes to shove, the choosing is subjective. My pieces may not have been picked by the editorial board, but those who have seen them have given me very positive feedback so I know I am on the right track as I continue creating in my own special style.

I titled this one, “O” Baby, I love your curves! 

I know it is very trendy right now to use text in your designs, whether as part of the fabric, or as part of the design, but I have been doing this for a long time. Some of my earliest pieces were based on phrases and words. This time I decided to hi-light one of my most favourite letters!

When I started studying signwriting we had to draw pages and pages of letters. We had to draw them thin, thick, elongated, squat, with serifs, without and on and on......over and over till we got the dimensions perfect. When I worked for my Dad and computer generated letters were still far in the future, he would handcut vinyl letters, then adhere them to another color of vinyl and I would cut a 1/8" or 1/4” border all around. These letters were generally black with a gold outline and used for window lettering and it was great practice for learning their shapes. So, I love hand drawing letters and I love cutting them out almost as much! 

In “O” Baby, I used my hand dyed fabrics and I even cut those tiny, tiny yellowish dots out by hand! I used a few gold seed beads for embellishment and then twisted three different strands of decorative yarn and hand sewed it along the edge.

My second piece is called, “Summer Alliteration”. I love the curves of “S” as much as “O”’s!

I used my hand painted fabric for the background and then cut the letter “S” and all my “s’ words from my photographs that I had printed on fabric. I really like this concept, have used it in larger pieces, and plan on doing a lot more with it. I take a LOT of photos and I spend even more time editing them. So, using them in my fabric pieces is a natural progression for me. The shells are actual sea treasures and I have devised a method to sew them directly onto the fabric without making any holes in them. I didn’t take a photo of the back but it is also a photograph of gull tracks in the sand.

My history with letters led me to this more literal interpretation of the challenge. I know that “text” has taken on an entirely new meaning to this generation, but to me, the beauty will always be in the individual letters and the words you can create.

I am connecting to The Needle and Thread Network. Check out what Canadians all across this chilly country are up to this week.